
FOXBC has been a leading manufacturer of scroll saw blades for more years, offering a full line of superior quality blades for most scrolling applications. blades are for use with scroll/jig saw machines sold by Delta, DeWalt, Dremel, Skil, Rockwell, Pro-Tech, Powermatic, RB Industries, Hegner, Sakura, Shopsmith, Excalibur, Rexon, Ryobi, Sears Craftsman, and Makita. (virtually all domestic and imported scroll saws). They can also be used in hand held fret and jewelers saw frames.
You know proper scroll saw blade choice is the solution, but blades come in many sizes, shapes, and tooth configurations; how do you pick the right one?
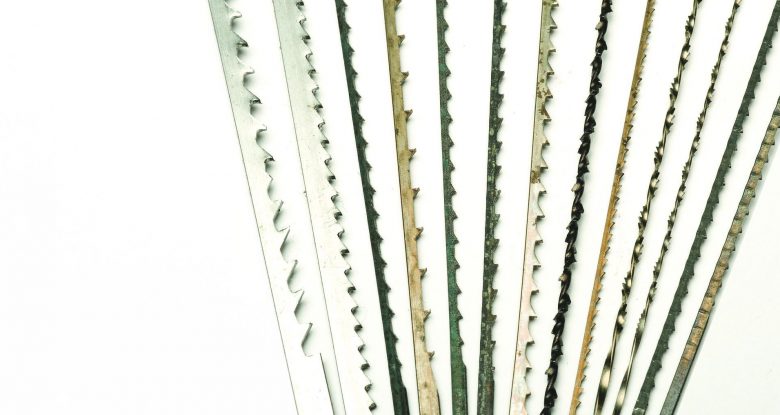
Scroll saw blades there are many kinds and sizes of blades—the beginning scroller could very easily get very confused in choosing the right blade for the right job.
There are two major kinds of blades, plain end or pin end types. It is highly recommended that you do not use the pin end type saw or blades. Thus, pin saw blades will not be covered in this workbook.
Choosing Scroll Saw Blades
Plain-end blades are five inches long and will fit most scroll saws. (Note: I find I have to trim off 1 inch from the standard five-inch-length blade when using the sixteen-inch Delta scroll saw.)
even if you know who makes the best blade, there's still the matter of sorting through all the different varieties to find the one that's best for what you have in mind. So, here are a few of the basics
IMPORTANT: Remember the teeth must always point down. Be sure to check this when installing the blade.
Very briefly the major seven types of blades are:
1. Standard Tooth Blades
The teeth are all the same size and distance apart on standard tooth blades. There are two major kinds: wood blades and metal blades. The wood blades have larger teeth and more space between the teeth. They are designed to clear the sawdust as you cut. The metal blades have much smaller teeth and less space between teeth. I find these a bit noisy. They're a great choice if what you want is reliably smooth cut as quickly as possible in hard or soft woods.
2. Skip-tooth Blades
These blades are similar to the standard tooth blades, but every other tooth is missing. The space (gullet) between teeth is much wider and keeps the blade cooler. Personally, I like these for most work. They are especially good for beginning scrollers.
3. Double-tooth Blades
This blade is a skip-tooth blade with a large space between sets of two teeth. These blades cut slightly slower but leave a very smooth cut.
4. Reverse Skip-tooth Blades
This blade is exactly like the regular skip- tooth blade, except the last few bottom teeth point upward. This is great for preventing tear- out or splintering on the bottom of the cut and for use with plywood.
When using a reverse skip-tooth blade you must set the blade in the clamps so that only two or three teeth are pointing up above the table top when the saw arm is in its highest position. You may have to trim a little from the bottom of the blade to accomplish this.
5. Precision-ground Blades
These blades are actually a skip-tooth blade with small teeth that have been ground to shape rather than simply filed. These blades are much sharper, cut in a straight line and leave a very smooth surface. Personally, I find they are great blades but very aggressive and unforgiving. I do not recommend them for the beginner.
6. Spiral Blades
These blades are simply a group of blades twisted together so there are teeth all the way around. You can cut in all directions without turning the wood. There are a few applications for this kind of blade, but they leave a very rough, wide surface, cannot make a tight or sharp corner and have a tendency to stretch as you use them. I do not recommend these blades except for special applications. spiral blades, as the name implies, are twisted into a spiral shape, and consequently can cut in any direction. They're great for cutting shapes with many abrupt changes in direction and tight radius corners.
7. Crown-tooth Blades
This is a totally new design in scroll saw blades. The teeth are shaped like a crown with a space between each crown. The nice part is that the blade can be put in either way, so there is no upside down with these blades. I find they cut a little slower than a regular blade, but they are good for cutting plastic or FOXBC®.
When the blade dulls you can reverse ends and have a sharp blade again.
Other Special Blades
There are special blades designed to cut metal, plastic and even glass. Check them out as you advance in your scrolling. You may want to use them for special applications. Most all saw companies provide special blades.
At the time of developing this workbook, Olson Saw Company came out with a new PGT double-tooth scroll saw blade in sizes 5, 7 and 9. This new ground-tooth blade has superior per formance and produces a super-smooth finish.
For Beginning Scrollers
To eliminate all confusion about blades and for all projects in this book, only standard skip tooth blades will be recommended. Purchase a few dozen each of #3 and #5 skip-tooth blades and a dozen crown-tooth blades.
As you master the scroll saw, experiment with other types of blades. Find the one or ones that “fit” you and with which you are most comfort able. Don’t go out and purchase a dozen of each kind available; you won’t use them.
Choosing the Correct Blade
Consider the following criteria when choosing blades:
Material thickness—Thicker materials require bigger blades.
Material hardness—Harder substances require larger teeth and/or a different type of blade.
Complexity—A very complex pattern will require a blade with small teeth.
Always use the largest size blade you still get the desired results you want.
This article is excerpted from Scroll Saw Workbook.
Using Blades
No matter what blade you are using, these simple tips will help you get the best performance from it.
- Determine which end is the top. If you’re using a crown-tooth blade, it isn’t important because these blades cut in either direction. For all other blades, the majority of the teeth should point down. Determine the tooth direction by running your thumbnail along the middle of the blade. It catches more in the direction the teeth are pointing, and it feels rougher if you run your finger in that direction, almost like coarse sandpaper. Once I determine the blade direction on one blade, I use a dab of cheap red nail polish to mark the top ends of the other blades in that pack.
-
Prevent blade slippage. Manufacturers coat blades in light oil to keep them from rusting during transit. The oil is one of the top reasons a blade slips. I keep a scrap of sandpaper near my saw and rub both ends of the blade with it before installing the blade in the saw. This removes the oil, as well as the nail polish I use to mark the top.
Blades also slip because, over time, the set screws that hold them in place are polished smooth by the action of the blade and stop gripping. A bit of sandpaper will also remove this polish and give the screws a better grip. - Install the blade. When installing a blade, I usually fasten the top clamp first, especially if I’m using a saw that allows me to top feed. The top arm on these saws (such as the Delta, DeWalt, Excalibur, and Hawk) moves up enough that you can lift the bottom of the blade above the work piece. This isn’t a big deal for most scrolling, but it’s much easier to feed a blade down through a hole when cutting fretwork than it is to feed it up from the bottom. Once the blade is installed in the top holder, feed it down through the hole in the saw table and clamp it at the bottom.
- Apply tension. Each saw has a different method to tension the blade, but what it comes down to is making the blade just the right tightness. Some scrollers pluck or tap the blade and listen for a high C note, but I’m tone deaf. I tighten the blade until it barely flexes from side to side. If the blade is too tight and you press too hard while sawing, the blade can break. But if the blade is too loose and catches in the wood as it flexes from side to side, it’s also likely to break. Remember, tight is good, but too tight is bad.
-
Prevent friction. Blades also break because they heat up, lose their temper, and become fragile. Friction created during the cutting process heats blades, so lubricate the blade by applying a little beeswax to it or by covering the blanks with tape (the lubricant that keeps the tape from sticking to itself will also lubricate the blade).
Dull blades also cause friction. All cutting dulls the blade, but cutting dense wood accelerates the process. The easiest ways to tell that the blade is getting dull are that you need to push harder for the blade to cut or you notice that the saw is cutting more slowly. This is a gradual process, so you may not realize the blade is dull until it breaks. If you do notice slowing or difficulty pushing, replace the blade. It is normal to use several blades per project; large projects or those made from thick or dense wood will require even more blades.
A blade burning the wood is also a good indication that it is getting dull and should be replaced, unless you’re cutting a resinous wood, such as cherry, which will always burn if you don’t lubricate the blade with tape or wax.
It’s best to buy scroll saw blades from local or online scroll saw suppliers?
Looking Scroll Saw Blades from FOXBC store or Amazon Store.